最近学习netty,为了实践一些知识点,写了一个小demo,完成了client和server端之间的加密数据传输,并使用了protobuf对数据进行封装,代码虽然简单,但对初学者学习netty应该会有些许帮助,特此记录分享。
首先来看Server的实现,Server和所有的netty示例代码差不多,都是构建netty的ServerBootstrap。
package xyz.xindoo.netty;
import io.netty.bootstrap.ServerBootstrap;
import io.netty.channel.ChannelFuture;
import io.netty.channel.ChannelInitializer;
import io.netty.channel.ChannelOption;
import io.netty.channel.ChannelPipeline;
import io.netty.channel.EventLoopGroup;
import io.netty.channel.nio.NioEventLoopGroup;
import io.netty.channel.socket.SocketChannel;
import io.netty.channel.socket.nio.NioServerSocketChannel;
import io.netty.handler.codec.LengthFieldBasedFrameDecoder;
import io.netty.handler.codec.LengthFieldPrepender;
public class Server {
public static void main(String[] args) {
EventLoopGroup bossGroup = new NioEventLoopGroup(1);
EventLoopGroup workerGroup = new NioEventLoopGroup();
ServerBootstrap b = new ServerBootstrap();
b.group(bossGroup, workerGroup)
.channel(NioServerSocketChannel.class)
.option(ChannelOption.SO_BACKLOG, 100)
.childHandler(new ChannelInitializer<SocketChannel>() {
@Override
public void initChannel(SocketChannel ch) throws Exception {
ChannelPipeline p = ch.pipeline();
p.addLast(new LengthFieldBasedFrameDecoder(10240, 0, 2, 0, 2));
p.addLast(new LengthFieldPrepender(2));
p.addLast(new DecryptHandler());
p.addLast(new EncryptHandler());
p.addLast(new MessageDecoder());
p.addLast(new MessageEncoder());
p.addLast(new ServerHandler());
}
});
try {
ChannelFuture f = b.bind(9999).sync();
} catch (InterruptedException e) {
e.printStackTrace();
}
}
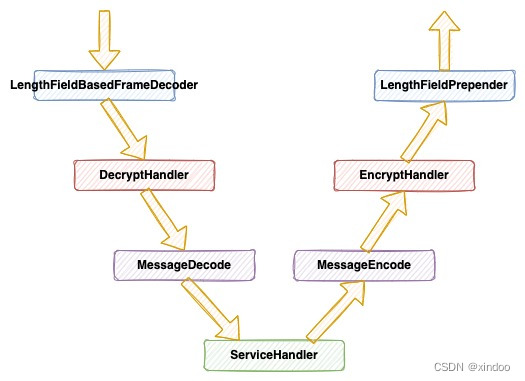
} 在这个示例中,我其实是实现了3层编解码,第一层的LengthFieldXXX对应的是netty中的变成编码,第二层的DecryptHandler和EncryptHandler实现了数据的加解密,第三次的MessageDecode和MessageEncode是对数据进行protobuf序列化和反序列化。而最后的ServerHandler实现了对数据的处理,实际这里没啥逻辑,就是返回了消息体的原始长度。整体消息出入处理流程如下:
接下来我们看下Client的具体实现。
package xyz.xindoo.netty;

import io.netty.bootstrap.Bootstrap;
import io.netty.channel.Channel;
import io.netty.channel.ChannelInitializer;
import io.netty.channel.ChannelOption;
import io.netty.channel.ChannelPipeline;
import io.netty.channel.EventLoopGroup;
import io.netty.channel.nio.NioEventLoopGroup;
import io.netty.channel.socket.SocketChannel;
import io.netty.channel.socket.nio.NioSocketChannel;
import io.netty.handler.codec.LengthFieldBasedFrameDecoder;
import io.netty.handler.codec.LengthFieldPrepender;

/**
 * @author zhangweibin005
 * @date 2022/7/12
 */
public class Client {
    public static void main(String[] args) {
        EventLoopGroup bossGroup = new NioEventLoopGroup(1);
        Bootstrap bootstrap = new Bootstrap();
        bootstrap.group(bossGroup)
                 .channel(NioSocketChannel.class)
                 .option(ChannelOption.SO_BACKLOG, 100)
                 .handler(new ChannelInitializer<SocketChannel>() {
                     @Override
                     public void initChannel(SocketChannel ch) throws Exception {
                         ChannelPipeline p = ch.pipeline();
                         p.addLast(new LengthFieldBasedFrameDecoder(10240, 0, 2, 0, 2));
                         p.addLast(new LengthFieldPrepender(2));
                         p.addLast(new DecryptHandler());
                         p.addLast(new EncryptHandler());
                         p.addLast(new MessageDecoder());
                         p.addLast(new MessageEncoder());
                         p.addLast(new ClientHandler());
                     }
                 });
        try {
            Channel c = bootstrap.connect("127.0.0.1", 9999).sync().channel();
            ClientHandler clientHandler = c.pipeline().get(ClientHandler.class);
            clientHandler.start();
        } catch (Exception e) {
            throw new RuntimeException(e);
        }
    }
}
Client和Server乍眼一看几乎一模一样,仔细看其实是有些小细节不同,和Server不同的是Clint使用了Bootstrap而不是ServerBootstrap。另外这里需要特别提醒下,很多时候我们在写Server或者Client时所有的编解码都是成对出现的,而且通常使用同一种,会导致一种误区,Server端或者Client Encoder和Decoder必须成对出现。比如用了StringEncoder就必须用StringDecoder。 实际上这不完全对,成对出现是指Server和Client端需要使用对应的Decoder和Encoder,也就是出单其中某一端,其实可以使用不同的Decoder和Encoder。
接下来我们看下其他几个的代码,因为LengthFieldBasedFrameDecoder和LengthFieldPrepender是netty提供的,所以这里不再展示。我们先来看下加解密部分DecryptHandler和EncryptHandler。
package xyz.xindoo.netty;

import io.netty.buffer.ByteBuf;
import io.netty.buffer.Unpooled;
import io.netty.channel.ChannelHandlerContext;
import io.netty.handler.codec.MessageToMessageEncoder;
import lombok.extern.slf4j.Slf4j;

import javax.crypto.Cipher;
import javax.crypto.spec.SecretKeySpec;
import java.security.MessageDigest;
import java.util.Arrays;
import java.util.List;

@Slf4j
public class EncryptHandler extends MessageToMessageEncoder<ByteBuf> {
    private static SecretKeySpec secretKey;
    private static byte[] key = Constants.SK.getBytes();
    private static Cipher cipher;

    static {
        MessageDigest sha = null;
        try {
            sha = MessageDigest.getInstance("SHA-1");
            key = sha.digest(key);
            key = Arrays.copyOf(key, 16);
            secretKey = new SecretKeySpec(key, "AES");
            cipher = Cipher.getInstance("AES/ECB/PKCS5Padding");
            cipher.init(Cipher.ENCRYPT_MODE, secretKey);
        } catch (Exception e) {
            log.error("", e);
        }
    }

    @Override
    protected void encode(ChannelHandlerContext ctx, ByteBuf msg, List<Object> out) throws Exception {
        byte[] array = new byte[msg.readableBytes()];
        msg.getBytes(msg.readerIndex(), array);
        // 调用cipher的api对数据完成加密
        out.add(Unpooled.copiedBuffer(cipher.doFinal(array)));
    }
}
package xyz.xindoo.netty;
import io.netty.buffer.ByteBuf;
import io.netty.buffer.Unpooled;
import io.netty.channel.ChannelHandlerContext;
import io.netty.handler.codec.MessageToMessageDecoder;
import lombok.extern.slf4j.Slf4j;
import javax.crypto.Cipher;
import javax.crypto.spec.SecretKeySpec;
import java.security.MessageDigest;
import java.util.Arrays;
import java.util.List;
@Slf4j
public class DecryptHandler extends MessageToMessageDecoder<ByteBuf> {
private static SecretKeySpec secretKey;
private static byte[] key = Constants.SK.getBytes();
private static Cipher cipher;
static {
MessageDigest sha = null;
try {
sha = MessageDigest.getInstance("SHA-1");
key = sha.digest(key);
key = Arrays.copyOf(key, 16);
secretKey = new SecretKeySpec(key, "AES");
cipher = Cipher.getInstance("AES/ECB/PKCS5Padding");
cipher.init(Cipher.DECRYPT_MODE, secretKey);
} catch (Exception e) {
log.error("", e);
}
}
@Override
protected void decode(ChannelHandlerContext ctx, ByteBuf msg, List<Object> out) throws Exception {
int length = msg.readableBytes();
byte[] array = new byte[length];
msg.getBytes(msg.readerIndex(), array);
// 使用cipher对数据解密
out.add(Unpooled.copiedBuffer(cipher.doFinal(array)));
}
} 这里我使用了javax.crypto.Cipher类,并使用AES方式对数据完成加解密。注意,Cipher并不是线程安全的,所以多线程之间不能同时使用同一个Cipher对象,如果有了解Netty原理的话,你应该可以理解,我这里这么用没啥问题。
接下来我们看看protobuf的部分,我实现用protobuf定义了message数据格式,只有简单的三个字段,如下:
syntax = "proto3";

option java_outer_classname = "MessageProto";

message Message {
    int64 ts = 1;
    string name = 2;
    string msg = 3;
 }
通过protoc生成了MessageProto.java代码,这里生成的java代码太长,我就不贴出来了,生成的命令如下:
protoc message.proto --java_out=.MessageProto.java就可以复制到代码中使用了,关于MessageProto的具体使用方法,可以参考MessageDecoder和MessageEncoder。
package xyz.xindoo.netty;

import io.netty.buffer.ByteBuf;
import io.netty.channel.ChannelHandlerContext;
import io.netty.handler.codec.MessageToMessageDecoder;

import java.util.List;
public class MessageDecoder extends MessageToMessageDecoder<ByteBuf> {
    @Override
    protected void decode(ChannelHandlerContext ctx, ByteBuf msg, List<Object> out) throws Exception {
        byte[] array = new byte[msg.readableBytes()];
        msg.getBytes(msg.readerIndex(), array);
        MessageProto.Message message = MessageProto.Message.parseFrom(array);
        out.add(message);
    }
}
package xyz.xindoo.netty;
import io.netty.buffer.Unpooled;
import io.netty.channel.ChannelHandlerContext;
import io.netty.handler.codec.MessageToMessageEncoder;
import java.util.List;
public class MessageEncoder extends MessageToMessageEncoder<MessageProto.Message> {
@Override
protected void encode(ChannelHandlerContext ctx, MessageProto.Message msg, List<Object> out) throws Exception {
byte[] bytes = msg.toByteArray();
out.add(Unpooled.copiedBuffer(bytes));
}
}最后我们来看下ServerHandler和ClientHandler的实现。
package xyz.xindoo.netty;

import io.netty.channel.ChannelHandlerContext;
import io.netty.channel.SimpleChannelInboundHandler;

public class ServerHandler extends SimpleChannelInboundHandler<MessageProto.Message> {
    @Override
    public void channelRead0(ChannelHandlerContext ctx, MessageProto.Message msg) throws Exception {
        System.out.println(msg.getMsg());
        MessageProto.Message resp = MessageProto.Message.newBuilder()
                                                        .setTs(System.currentTimeMillis())
                                                        .setMsg("消息长度:" + msg.getMsg().length())
                                                        .build();
        ctx.writeAndFlush(resp);
    }
}
package xyz.xindoo.netty;
import io.netty.bootstrap.Bootstrap;
import io.netty.channel.Channel;
import io.netty.channel.ChannelInitializer;
import io.netty.channel.ChannelOption;
import io.netty.channel.ChannelPipeline;
import io.netty.channel.EventLoopGroup;
import io.netty.channel.nio.NioEventLoopGroup;
import io.netty.channel.socket.SocketChannel;
import io.netty.channel.socket.nio.NioSocketChannel;
import io.netty.handler.codec.LengthFieldBasedFrameDecoder;
import io.netty.handler.codec.LengthFieldPrepender;
public class Client {
public static void main(String[] args) {
EventLoopGroup bossGroup = new NioEventLoopGroup(1);
Bootstrap bootstrap = new Bootstrap();
bootstrap.group(bossGroup)
.channel(NioSocketChannel.class)
.option(ChannelOption.SO_BACKLOG, 100)
.handler(new ChannelInitializer<SocketChannel>() {
@Override
public void initChannel(SocketChannel ch) throws Exception {
ChannelPipeline p = ch.pipeline();
p.addLast(new LengthFieldBasedFrameDecoder(10240, 0, 2, 0, 2));
p.addLast(new LengthFieldPrepender(2));
p.addLast(new DecryptHandler());
p.addLast(new EncryptHandler());
p.addLast(new MessageDecoder());
p.addLast(new MessageEncoder());
p.addLast(new ClientHandler());
}
});
try {
Channel c = bootstrap.connect("127.0.0.1", 9999).sync().channel();
ClientHandler clientHandler = c.pipeline().get(ClientHandler.class);
clientHandler.start();
} catch (Exception e) {
throw new RuntimeException(e);
}
}
}